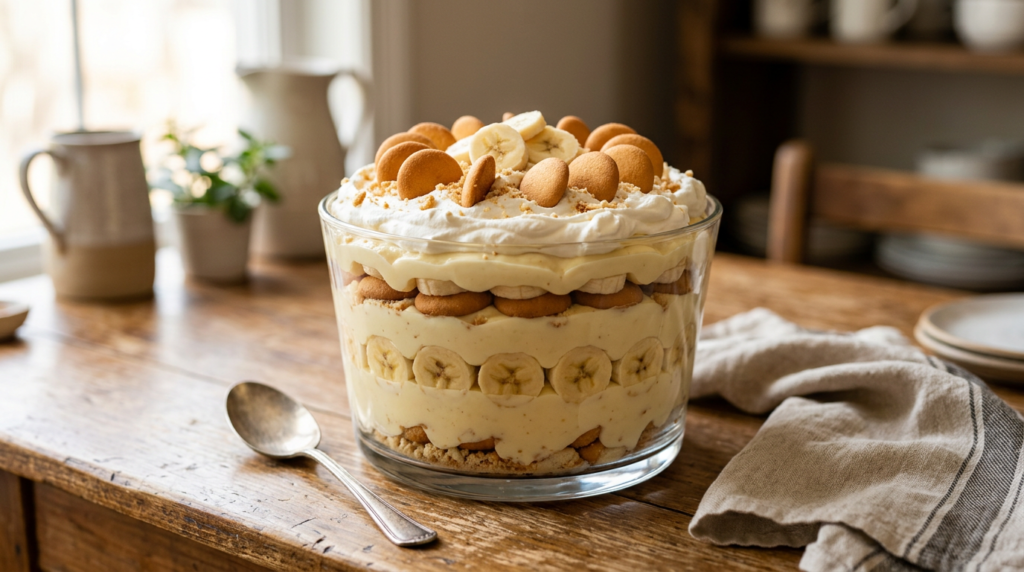
Discover the timeless delight of classic banana pudding, a dessert that effortlessly combines creamy, sweet, and comforting flavors. This no-bake recipe simplifies the process, allowing you to create a show-stopping treat with minimal effort. Imagine velvety vanilla pudding, ripe banana slices, and crunchy vanilla wafers all coming together in a harmonious symphony of textures and tastes. It’s the perfect solution for a crowd-pleasing dessert that requires no oven time, making it ideal for busy days or warm weather gatherings. Get ready to create a dessert that will have everyone asking for seconds!
Recipe Info
- Prep Time: 20 minutes
- Chill Time: 4 hours
- Total Time: 4 hours 20 minutes
- Yield: 8-10 servings
Ingredients
For the Pudding:
- 2 (3.4 ounce) packages instant vanilla pudding mix
- 4 cups cold whole milk
- 1 (14 ounce) can sweetened condensed milk
- 1 teaspoon vanilla extract
- 1 (8 ounce) package cream cheese, softened
- 1 (8 ounce) container frozen whipped topping, thawed (like Cool Whip)
For Assembling:
- 5-6 ripe but firm bananas, sliced into 1/4-inch rounds
- 1 (11 ounce) box vanilla wafers
- Extra whipped topping or fresh whipped cream for garnish (optional)
- Additional vanilla wafers or banana slices for garnish (optional)
Step-by-Step Instructions
- Prepare the Pudding Base: In a large mixing bowl, whisk together the instant vanilla pudding mixes and cold whole milk for 2 minutes, or until the mixture begins to thicken. Set aside for 5 minutes to allow it to fully set.
- Create the Creamy Layer: In a separate large bowl, beat the softened cream cheese with an electric mixer until smooth and creamy, about 1-2 minutes. Gradually add the sweetened condensed milk and vanilla extract, beating until well combined and no lumps remain.
- Combine and Fold: Gently fold the thawed whipped topping into the cream cheese mixture until fully incorporated and light. Then, carefully fold this cream cheese mixture into the prepared vanilla pudding until everything is smoothly combined. Be careful not to overmix, as this can deflate the whipped topping.
- Layer the Pudding: In a 9×13 inch baking dish or a large trifle bowl, spread a thin layer of the pudding mixture on the bottom. Arrange a single layer of vanilla wafers over the pudding.
- Add Bananas: Place a layer of sliced bananas over the vanilla wafers.
- Repeat Layers: Spoon about one-third of the remaining pudding mixture over the bananas, spreading it evenly. Repeat with another layer of vanilla wafers, then bananas, and then the pudding. Continue layering until all ingredients are used, ending with a final layer of pudding on top.
- Chill Thoroughly: Cover the dish tightly with plastic wrap and refrigerate for at least 4 hours, or preferably overnight. This allows the wafers to soften and the flavors to meld beautifully.
- Garnish and Serve: Before serving, you can garnish with additional whipped topping, a few extra vanilla wafers, or fresh banana slices. Serve chilled.
Pro Tips for Success
- Choose the Right Bananas: Use ripe but still firm bananas. They should have a few brown spots, indicating sweetness, but not be overly soft or mushy, as they will break down too quickly in the pudding.
- Chill Time is Crucial: Do not rush the chilling process. A minimum of 4 hours, and ideally overnight, allows the vanilla wafers to soften to a cake-like texture and the flavors to fully develop and meld, creating that signature banana pudding experience.
- Prevent Banana Browning: To keep your banana slices from browning too quickly, you can lightly toss them in a tablespoon of lemon juice or pineapple juice before layering. This is especially helpful if making the pudding ahead of time.
- Whip Cream Cheese Properly: Ensure your cream cheese is truly softened to room temperature. This prevents lumps in your creamy layer and ensures a smooth, velvety texture when combined with the other ingredients.
Variations & Substitutions
- Gluten-Free Option: Simply swap out traditional vanilla wafers for gluten-free vanilla wafers. Most major brands now offer a delicious gluten-free alternative.
- Dairy-Free/Vegan Option: Use unsweetened almond milk or oat milk for the pudding mix, a dairy-free cream cheese alternative, and a coconut-based whipped topping. Ensure your instant pudding mix is dairy-free (some are, some aren’t).
- Lighter Version: Use skim milk, a sugar-free instant vanilla pudding mix, and a light whipped topping. This will reduce calories and fat without sacrificing too much flavor.
- Flavor Boost: For an extra layer of flavor, try adding a pinch of cinnamon or nutmeg to the pudding mixture. You could also use banana-flavored instant pudding for an intensified banana taste.
- Ingredient Swaps: Instead of vanilla wafers, consider using shortbread cookies or even graham crackers for a different texture and flavor profile.
Serving Suggestions
Classic No-Bake Banana Pudding is a versatile dessert that shines on many occasions. It’s a quintessential Southern comfort food, perfect for potlucks, family gatherings, barbecues, or any time you crave a sweet, nostalgic treat. Serve it chilled, straight from the refrigerator. It pairs wonderfully with a simple cup of coffee or iced tea. For a truly decadent experience, a scoop of vanilla bean ice cream alongside is a delightful addition, though the pudding is rich and satisfying enough on its own.
Storage & Reheating
- Fridge Storage: Store leftover banana pudding tightly covered with plastic wrap in the refrigerator for up to 3-4 days. The bananas will soften and may brown slightly over time, but the pudding will still be delicious.
- Freezer Storage: Freezing banana pudding is generally not recommended. The texture of the bananas and wafers can become mushy and watery upon thawing, and the pudding itself may separate. It’s best enjoyed fresh and chilled from the refrigerator.
- Reheating: This is a no-bake, chilled dessert, so no reheating is necessary or recommended. Enjoy it cold!
Frequently Asked Questions
Can I make banana pudding ahead of time?
Absolutely! In fact, making it ahead is highly recommended. Prepare the pudding at least 4 hours in advance, or even the day before, to allow the wafers to soften and the flavors to fully develop. Just be sure to cover it tightly and keep it refrigerated.
Why is my banana pudding watery?
Watery pudding can occur if the instant pudding mix wasn’t allowed to set long enough, or if the milk used wasn’t cold enough. Ensure you whisk the pudding and milk for the full 2 minutes and let it sit for 5 minutes before combining with other ingredients. Also, using overly ripe, mushy bananas can release too much moisture.
What’s the best way to prevent bananas from browning?
While some browning is natural, you can slow it down by lightly tossing your sliced bananas in a small amount of lemon juice or pineapple juice before layering them into the pudding. This creates a protective barrier and helps maintain their fresh appearance for longer.
Final Thoughts
There’s something truly magical about a classic banana pudding. It’s a dessert that evokes warmth, comfort, and a touch of nostalgia with every spoonful. This no-bake rendition makes it incredibly accessible, allowing you to whip up a batch of creamy, dreamy goodness without ever turning on your oven. Whether you’re sharing it with loved ones or savoring a quiet moment, this banana pudding promises a delightful escape into sweet, comforting bliss. Give it a try – your taste buds will thank you!