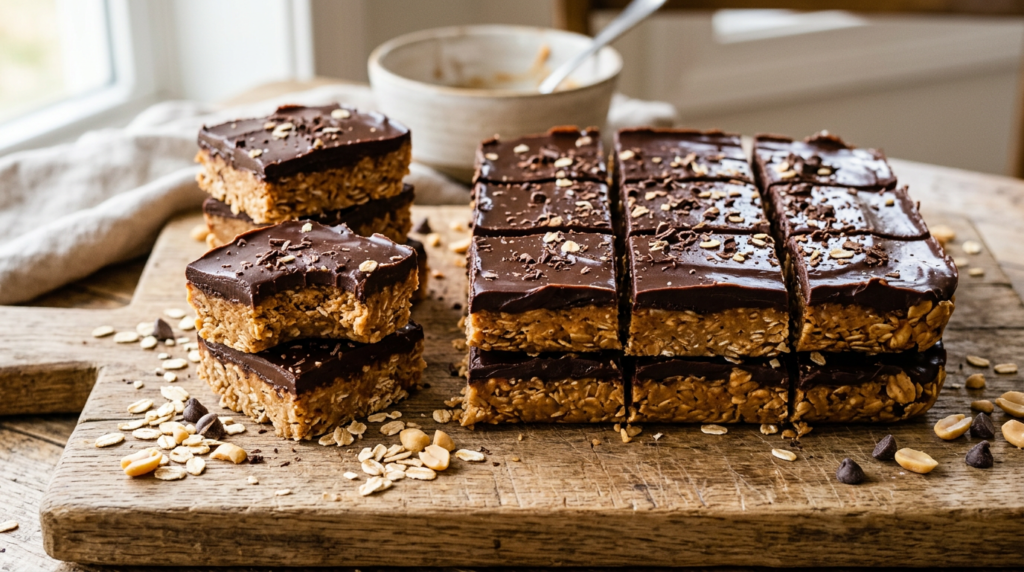
Imagine a treat that delivers on all fronts: rich, creamy, satisfyingly chewy, and requires absolutely no baking. That’s exactly what you get with these incredible No-Bake Peanut Butter Chocolate Oatmeal Bars. This recipe is a true kitchen hero, solving the universal problem of needing a delicious homemade dessert or snack without the fuss and heat of an oven. Whether you’re short on time, looking to avoid heating your kitchen on a warm day, or simply prefer the ease of a no-bake option, these bars are your perfect solution. Each bite offers a delightful contrast: the smooth, salty-sweet embrace of peanut butter perfectly complemented by a decadent layer of chocolate, all bound together with wholesome, chewy oats. The texture is a dream – firm enough to hold its shape, yet soft and yielding as it melts in your mouth. The flavor profile is a classic combination that appeals to nearly everyone, making these bars an instant crowd-pleaser. They’re not just easy; they’re a truly satisfying indulgence that will have you reaching for another slice. Get ready to enjoy a simple pleasure that tastes anything but simple.
Prep Time: 15 minutes | Chill Time: 2 hours | Total Time: 2 hours 15 minutes | Yield: 16 bars
Ingredients
For the Oatmeal Base:
- 1 ½ cups creamy peanut butter
- ½ cup unsalted butter, melted
- 1 cup powdered sugar
- 2 teaspoons vanilla extract
- 3 cups quick-cooking oats
For the Chocolate Topping:
- 1 ½ cups semi-sweet chocolate chips
- ¼ cup creamy peanut butter
Step-by-Step Instructions
- Prepare Your Pan: Line a 9×13-inch baking pan with parchment paper, leaving an overhang on the sides to easily lift the bars out later. Lightly grease the parchment paper if desired.
- Combine Wet Ingredients: In a large mixing bowl, combine the 1 ½ cups creamy peanut butter, melted unsalted butter, powdered sugar, and vanilla extract. Whisk or stir well until the mixture is completely smooth and creamy, with no lumps of powdered sugar visible.
- Add Oats: Gradually add the quick-cooking oats to the wet mixture, stirring with a sturdy spoon or spatula until the oats are fully incorporated and evenly coated. The mixture will be thick and somewhat stiff.
- Press into Pan: Transfer the oatmeal base mixture into the prepared 9×13-inch pan. Using the back of a spoon, a spatula, or your hands (lightly greased if it’s too sticky), press the mixture down firmly and evenly into the pan. Make sure it’s compacted well to ensure the bars hold together.
- Prepare Chocolate Topping: In a microwave-safe bowl, combine the semi-sweet chocolate chips and ¼ cup creamy peanut butter. Microwave in 30-second intervals, stirring well after each interval, until the chocolate is completely melted and smooth. Alternatively, melt over a double boiler.
- Pour Chocolate Layer: Pour the melted chocolate mixture evenly over the pressed oatmeal base in the pan. Use an offset spatula or the back of a spoon to spread it smoothly to the edges.
- Chill to Set: Place the pan in the refrigerator for at least 2 hours, or until the chocolate topping is completely firm and set. This is crucial for clean slicing.
- Slice and Serve: Once fully chilled, use the parchment paper overhang to lift the entire slab out of the pan onto a cutting board. Using a sharp knife, cut the bars into desired sizes, typically 16 squares. Enjoy immediately!
Pro Tips for Success
- Use Quick-Cooking Oats: While old-fashioned oats can work, quick-cooking oats absorb moisture faster and create a softer, chewier texture that is ideal for no-bake bars. They also bind more effectively without needing to be cooked.
- Pack the Base Firmly: After adding the oats to the peanut butter mixture, ensure you press the base down very firmly into the pan. This compaction is key to preventing crumbly bars and ensures they hold their shape beautifully when cut.
- Don’t Overheat the Chocolate: When melting the chocolate and peanut butter for the topping, heat it gently and stir frequently. Overheating can cause the chocolate to seize or become grainy. Microwave in short bursts or use a double boiler for best results.
- Chill Thoroughly: Patience is a virtue here! Do not rush the chilling process. A minimum of 2 hours in the refrigerator ensures both layers are completely set, allowing for clean, neat cuts and preventing the bars from falling apart.
Variations & Substitutions
- Gluten-Free Option: Ensure your quick-cooking oats are certified gluten-free. Most oats are naturally gluten-free, but cross-contamination can occur during processing.
- Dairy-Free/Vegan Option: Use a plant-based butter substitute (like vegan butter sticks) and ensure your chocolate chips are dairy-free (many dark chocolate chips are). Most creamy peanut butter is naturally vegan.
- Nut Butter Swaps: While peanut butter is classic, you can experiment with other creamy nut butters like almond butter or cashew butter for a different flavor profile. Note that textures may vary slightly.
- Lighter Option: For a slightly lighter bar, you can reduce the powdered sugar in the base by ¼ cup. You could also use a natural sweetener like maple syrup or agave, but you might need to adjust the oat quantity slightly to maintain consistency.
- Add-ins: Fold in mini chocolate chips, chopped nuts (peanuts, walnuts), or shredded coconut into the oat base for extra texture and flavor before pressing into the pan.
Serving Suggestions
These No-Bake Peanut Butter Chocolate Oatmeal Bars are incredibly versatile and perfect for a variety of occasions. Enjoy them as a satisfying afternoon snack to curb those sweet cravings, pack them in lunchboxes for a delightful treat, or serve them as an easy, crowd-pleasing dessert after dinner. They’re also fantastic for potlucks, bake sales (no baking required!), or simply as a grab-and-go breakfast bar on a busy morning. A tall glass of cold milk or a hot cup of coffee makes for an ideal pairing.
Storage & Reheating
Refrigerator: Store leftover No-Bake Peanut Butter Chocolate Oatmeal Bars in an airtight container in the refrigerator for up to 1 week. Separate layers with parchment paper if stacking to prevent sticking.
Freezer: For longer storage, wrap individual bars tightly in plastic wrap, then place them in a freezer-safe airtight container or bag. They will keep well in the freezer for up to 3 months. Thaw individual bars at room temperature for about 15-20 minutes before enjoying.
Reheating: These bars are best enjoyed chilled or at room temperature. No reheating is necessary or recommended, as the chocolate topping can melt and the texture may become too soft.
Frequently Asked Questions
Q: Can I use old-fashioned oats instead of quick-cooking oats?
A: While quick-cooking oats are recommended for their softer texture and better binding in no-bake recipes, you can use old-fashioned rolled oats. The bars might have a slightly chewier, firmer texture. Ensure they are well-mixed and pressed firmly into the pan.
Q: Why are my bars crumbly?
A: Crumbly bars are usually due to not pressing the oat mixture firmly enough into the pan, or not chilling them long enough. Make sure to really compact the base layer, and allow at least 2 hours (or more) in the refrigerator for the bars to fully set before cutting.
Q: Can I make these ahead of time?
A: Absolutely! These no-bake bars are an excellent make-ahead treat. Prepare them up to 3-4 days in advance and store them in an airtight container in the refrigerator. They actually taste even better after the flavors have had a chance to meld.
Final Thoughts
These No-Bake Peanut Butter Chocolate Oatmeal Bars are more than just a recipe; they’re a testament to how simple ingredients can create something truly extraordinary. With their irresistible combination of creamy peanut butter, rich chocolate, and wholesome oats, they offer a satisfying sweetness and delightful chewiness that’s hard to beat. Perfect for any time you need a quick, delicious treat without the fuss, these bars are sure to become a cherished favorite in your kitchen. Go ahead, whip up a batch, and discover your new go-to no-bake indulgence!