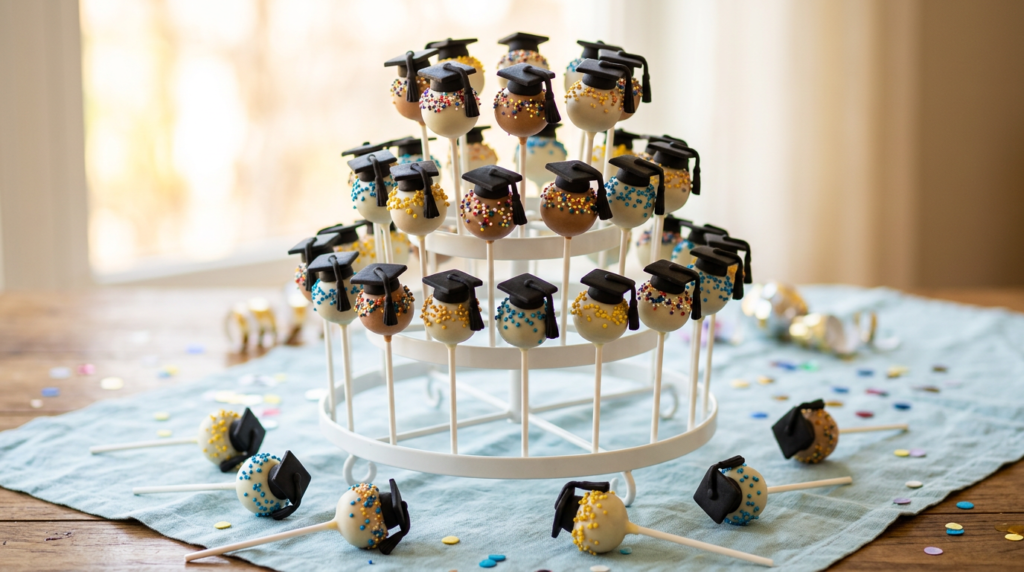
Graduation season is a time for celebration, reflection, and, of course, delicious treats! As caps fly and diplomas are awarded, what better way to honor the graduates than with a dessert that’s as charming and memorable as their achievement? These Mini Graduation Cake Pops are the perfect bite-sized confections to mark such a momentous occasion. Forget the hassle of slicing a large cake; these individual delights offer a fun, portable, and incredibly festive option for any graduation party, big or small. They solve the common party dilemma of serving dessert gracefully, allowing guests to mingle and enjoy without needing plates or forks.
Imagine a moist, tender cake interior, perfectly blended with creamy frosting, then dipped in a smooth, vibrant candy coating. Each pop is a tiny sphere of joy, offering a delightful contrast of textures – the soft cake, the crisp shell, and the playful crunch of sprinkles. The beauty of these cake pops lies not just in their adorable appearance, but also in their customizable nature. You can easily match them to school colors, add tiny edible graduation caps, or sprinkle them with celebratory glitter, making each one a personalized tribute to the graduate’s hard work. They’re sweet, satisfying, and guaranteed to bring smiles, making them an absolute must-have on your dessert table. Get ready to create a batch of these delightful treats that are sure to be the star of your graduation festivities!
Recipe Info:
- Prep Time: 45 minutes
- Cook Time: 30 minutes
- Chilling Time: 2 hours
- Total Time: 3 hours 15 minutes
- Yield: 24-30 cake pops
Ingredients
For the Cake Pops:
- 1 box (15.25 oz) yellow or white cake mix (plus ingredients called for on box: eggs, oil, water)
- 1 can (16 oz) vanilla frosting (or cream cheese frosting)
- 24-30 lollipop sticks
For the Coating & Decoration:
- 12-16 oz candy melts (white, black, or school colors)
- 1-2 teaspoons shortening or coconut oil (optional, for thinning)
- Assorted sprinkles (gold, silver, school colors)
- Mini chocolate squares or mini Reese’s peanut butter cups (for graduation caps)
- Mini M&M’s or small candy pieces (for tassels)
- Edible glitter (optional)
Step-by-Step Instructions
- Bake the Cake: Prepare and bake the cake mix according to package directions in a 9×13 inch pan. Once baked, let the cake cool completely in the pan on a wire rack. This is crucial for easy crumbling.
- Crumble the Cake: Once the cake is fully cooled, crumble it into a large mixing bowl. Use your hands to break it down into very fine, even crumbs. Ensure there are no large chunks remaining.
- Mix with Frosting: Add about 3/4 of the can of frosting to the cake crumbs. Mix thoroughly with your hands until a dough-like consistency forms. It should be moist enough to roll into a ball without crumbling, but not sticky. Add more frosting, a tablespoon at a time, if needed.
- Roll the Cake Balls: Scoop out portions of the cake mixture (about 1.5 tablespoons each) and roll them into smooth, compact balls. Place them on a baking sheet lined with parchment paper.
- First Chill: Refrigerate the cake balls for at least 30 minutes to 1 hour. This helps them firm up and prevents them from falling apart when dipped.
- Prepare Sticks & Melt Candy: While the cake balls chill, melt the candy melts. Place them in a microwave-safe bowl and microwave in 30-second intervals, stirring well after each, until smooth and fully melted. If the candy is too thick, stir in 1-2 teaspoons of shortening or coconut oil to thin it slightly.
- Dip Sticks & Secure: Take the chilled cake balls out of the fridge. Dip the tip of each lollipop stick about 1/2 inch into the melted candy, then insert the stick into the center of a cake ball, pushing it about halfway through. This acts as a glue.
- Second Chill: Return the cake pops (with sticks inserted) to the refrigerator for another 15-20 minutes. This ensures the stick is firmly set and the cake ball is cold, which helps the coating set quickly.
- Dip the Cake Pops: Working with a few cake pops at a time, dip each one into the melted candy, submerging it completely. Gently tap the stick against the side of the bowl to remove any excess coating. Rotate the pop as you tap to ensure an even layer.
- Decorate Immediately: While the coating is still wet, attach your decorations. Place a mini chocolate square or Reese’s cup on top for the graduation cap, securing it with a tiny dab of melted candy if needed. Add a mini M&M or small candy piece for the tassel. Sprinkle with desired sprinkles.
- Set the Coating: Stand the decorated cake pops upright in a foam block or a tall glass until the candy coating is completely set and hardened. This usually takes about 15-30 minutes at room temperature, or faster in the refrigerator.
Pro Tips for Success
- Achieve the Perfect Cake Crumb Consistency: The key to great cake pops is the texture of your cake-and-frosting mixture. It should be firm enough to roll into a smooth ball without cracking, but not so dry that it crumbles, nor so wet that it’s sticky. Adjust frosting amounts gradually.
- Thorough Chilling is Non-Negotiable: Don’t rush the chilling steps. Cold cake balls are less likely to fall off the stick and will help the candy coating set quickly and smoothly, preventing cracks.
- Thin Your Candy Melts Wisely: If your candy melts are too thick, they’ll create a lumpy coating. A small amount of shortening or coconut oil (start with 1 teaspoon) can thin them to the perfect dipping consistency without affecting flavor or setting.
- Master the Tapping Technique: After dipping, gently tap the stick against the side of the bowl. This helps excess coating drip off, preventing puddles at the base and ensuring a thin, even layer. Rotate the pop as you tap for best results.
Variations & Substitutions
- Gluten-Free Option: Easily make these gluten-free by using a certified gluten-free cake mix and ensuring your frosting and candy melts are also gluten-free.
- Dairy-Free/Vegan Option: Opt for a vegan cake mix (many are accidentally vegan, just check ingredients), use a dairy-free frosting, and look for dairy-free candy melts or use tempered dark chocolate (ensure it’s dairy-free).
- Flavor Swaps: Experiment with different cake mix flavors like chocolate, red velvet, lemon, or funfetti. Pair with complementary frostings such as chocolate, cream cheese, or strawberry.
- Decoration Alternatives: Instead of chocolate squares, you can use square-shaped cookies or even pipe small squares with melted chocolate. Edible markers can add personalized messages or details to the caps.
- Lighter Option: While cake pops are inherently indulgent, you can use a sugar-free cake mix and sugar-free frosting for a slightly lighter base, though the candy coating will still contribute sugar.
Serving Suggestions
Mini Graduation Cake Pops are designed for celebration! Display them upright in a decorative cake pop stand, a block of floral foam covered with tissue paper, or even in a tall vase filled with candy. They make fantastic individual party favors, wrapped in small cellophane bags with a ribbon. Serve them alongside other graduation-themed treats like cookies or cupcakes, or as the star of your dessert table. They are best enjoyed at room temperature once the coating has fully set.
Storage & Reheating
- Refrigerator: Store finished cake pops in an airtight container in the refrigerator for up to 5-7 days. Allow them to come to room temperature for about 15-20 minutes before serving for the best texture.
- Freezer: Cake balls (before dipping) can be frozen in an airtight container for up to 1 month. Thaw in the refrigerator overnight before proceeding with dipping. Dipped and decorated cake pops can also be frozen for up to 1 month; thaw in the refrigerator and then bring to room temperature before serving.
- Reheating: No reheating is necessary for cake pops; they are best served at room temperature.
Frequently Asked Questions
Q: Can I make these graduation cake pops ahead of time?
A: Absolutely! You can prepare the cake balls and chill them for up to 2 days in the refrigerator, or freeze them for up to a month. Once dipped and decorated, the finished cake pops can be stored in an airtight container in the refrigerator for up to a week.
Q: Why are my cake pops cracking after dipping?
A: Cracking usually occurs due to a temperature shock (very cold cake pop dipped into very warm candy coating) or if the candy coating is too thick. Ensure your cake pops aren’t overly frozen, and thin your candy melts with a little shortening or coconut oil if they seem too viscous.
Q: What can I use if I don’t have candy melts?
A: While candy melts are ideal for their ease of use and smooth finish, you can use tempered white or dark chocolate. However, tempering chocolate can be tricky. Alternatively, you can use white chocolate chips mixed with a small amount of shortening or coconut oil, but the results may not be as smooth or vibrant as with candy melts.
Final Thoughts
These Mini Graduation Cake Pops are more than just a dessert; they’re a delightful symbol of achievement and a sweet way to celebrate a graduate’s milestone. With their moist cake interior, smooth candy shell, and charming decorations, they’re sure to be a memorable addition to any graduation party. Gather your ingredients, follow these steps, and get ready to create a batch of these irresistible treats that will have everyone cheering for more!