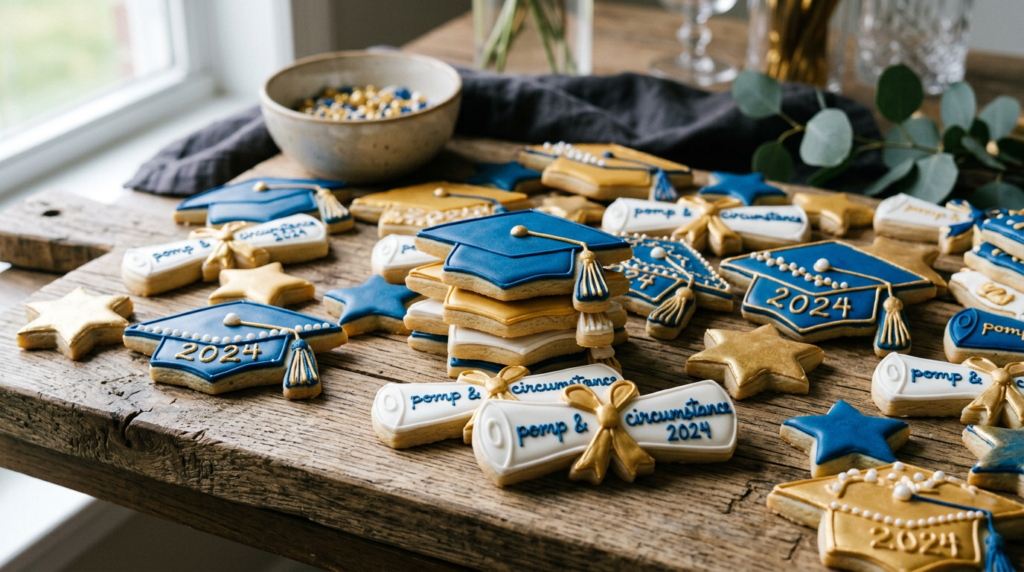
Graduation season is a time for celebration, reflection, and, of course, delicious treats! While the caps and gowns are donned and diplomas are handed out, the last thing you want is to be stressed in the kitchen. That’s where these Sheet Pan Graduation Sugar Cookies with Royal Icing come to the rescue. Imagine a batch of perfectly baked, tender sugar cookies, each one a canvas for festive royal icing designs, all made efficiently on a sheet pan. This recipe is designed to simplify your baking process, allowing you to create a large quantity of beautifully decorated cookies without the usual fuss. No more baking tiny batches one after another; we’re streamlining the process so you can spend more time celebrating your graduate.
These cookies aren’t just easy; they’re utterly delightful. Each bite offers a satisfying balance of a slightly crisp edge and a wonderfully soft, chewy center, infused with classic vanilla and a hint of almond. The royal icing provides a smooth, sweet finish that sets firm, making these cookies perfect for stacking, gifting, or arranging on a dessert table. The vibrant colors and intricate designs you can achieve with royal icing transform simple sugar cookies into edible works of art, making them a memorable addition to any graduation party. They’re a thoughtful, homemade touch that shows just how proud you are, without adding extra pressure to your busy schedule. Get ready to bake a batch of joy that tastes as good as it looks!
Recipe Info:
Prep Time: 45 minutes | Chill Time: 30 minutes | Cook Time: 45 minutes | Decorating Time: 60-90 minutes | Total Time: Approximately 3-3.5 hours | Yield: 3-4 dozen cookies (depending on size)
Ingredients
For the Sugar Cookies:
- 3 cups (360g) all-purpose flour, plus more for dusting
- 1 teaspoon baking powder
- 1/2 teaspoon salt
- 1 cup (226g) unsalted butter, softened
- 1 1/2 cups (300g) granulated sugar
- 2 large eggs
- 1 teaspoon vanilla extract
- 1/2 teaspoon almond extract (optional, but recommended)
For the Royal Icing:
- 4 cups (480g) powdered sugar, sifted
- 3 tablespoons meringue powder
- 1/2 teaspoon vanilla extract
- 1/4 teaspoon almond extract (optional)
- 6-8 tablespoons warm water, plus more as needed
- Gel food coloring (in desired graduation colors)
Step-by-Step Instructions
- Prepare the Cookie Dough: In a medium bowl, whisk together the flour, baking powder, and salt. Set aside.
- In a large bowl, using an electric mixer, cream together the softened butter and granulated sugar until light and fluffy, about 2-3 minutes.
- Beat in the eggs one at a time, mixing well after each addition. Stir in the vanilla extract and almond extract (if using).
- Gradually add the dry ingredients to the wet ingredients, mixing on low speed until just combined. Do not overmix. The dough will be soft.
- Divide the dough in half, flatten each half into a disc, wrap tightly in plastic wrap, and refrigerate for at least 30 minutes (or up to 2 days). Chilling is crucial for easy rolling and preventing spread.
- Roll and Cut the Cookies: Preheat your oven to 375°F (190°C). Line two large baking sheets with parchment paper.
- On a lightly floured surface, roll out one disc of chilled dough to about 1/4-inch thickness. Use graduation-themed cookie cutters (caps, diplomas, stars) to cut out shapes.
- Carefully transfer the cut-out cookies to the prepared baking sheets, leaving about 1 inch between them. Gather dough scraps, gently re-roll, and cut more cookies until all dough is used.
- Bake the Cookies: Bake for 8-12 minutes, or until the edges are lightly golden and the centers are set. Baking time will vary depending on cookie size and oven.
- Remove from the oven and let cool on the baking sheets for 5 minutes before transferring to a wire rack to cool completely. Cookies must be completely cool before icing.
- Prepare the Royal Icing: In a large bowl, combine the sifted powdered sugar and meringue powder.
- Add the vanilla extract, almond extract (if using), and 6 tablespoons of warm water. Beat on low speed with an electric mixer until combined, then increase to medium-high speed and beat for 5-7 minutes, until the icing is thick, glossy, and holds stiff peaks. If too thick, add more water 1 teaspoon at a time.
- Color and Decorate: Divide the royal icing into separate bowls for each desired color. Add gel food coloring a tiny bit at a time, mixing well until you achieve your desired shades.
- For outlining and detail work, the icing should be a thick consistency (like toothpaste). For flooding (filling in areas), thin a portion of each color with a few drops of water until it flows smoothly but still holds its shape for a few seconds when drizzled.
- Transfer icing to piping bags fitted with small round tips (or snip a tiny corner off the bag). Outline your cookies, then flood with thinner icing. Allow each color to set for 15-20 minutes before adding adjacent colors or details to prevent bleeding.
- Let decorated cookies dry completely at room temperature for several hours, or preferably overnight, until the icing is hard to the touch.
Pro Tips for Success
- Chill Your Dough Thoroughly: Don’t skip or rush the chilling step. Cold dough is less sticky, easier to roll, and significantly reduces the chances of your cookies spreading too much in the oven, ensuring crisp edges and defined shapes.
- Achieve the Right Icing Consistency: Royal icing consistency is key for successful decorating. For outlining, aim for a toothpaste-like thickness. For flooding, thin it gradually with water until it flows smoothly off a spoon and settles back into itself within 10-15 seconds. Test on a scrap piece of parchment paper first.
- Use Meringue Powder, Not Egg Whites: Meringue powder provides consistent results, is safer (no raw egg whites), and creates a more stable icing that dries hard and glossy. It’s readily available in baking aisles.
- Bake Until Just Set: For soft, chewy sugar cookies, remove them from the oven when the edges are just barely golden and the centers look set but still slightly soft. Overbaking will result in dry, crumbly cookies. They will continue to firm up as they cool.
Variations & Substitutions
- Gluten-Free Option: Substitute the all-purpose flour with a 1:1 gluten-free baking flour blend that contains xanthan gum. You may need to add an extra tablespoon or two of liquid (milk or water) to the dough if it seems too dry.
- Dairy-Free Option: Use a high-quality plant-based butter alternative (stick form works best) in place of dairy butter. Ensure your granulated sugar is vegan-friendly if strictly avoiding animal products.
- Flavor Swaps: Experiment with different extracts! Lemon zest and extract for a bright citrus cookie, or a touch of rum extract for a deeper flavor. For the royal icing, peppermint or orange extract can add a delightful twist.
- Decorating Themes: While perfect for graduation, this recipe is versatile. Change cookie cutter shapes and icing colors to suit any holiday or celebration – birthdays, baby showers, or seasonal events.
Serving Suggestions
These Sheet Pan Graduation Sugar Cookies are a fantastic standalone treat for any graduation party or gathering. Arrange them artfully on a tiered dessert stand or a large platter to create a stunning centerpiece. They also make wonderful party favors when individually wrapped in clear cellophane bags with a festive ribbon. Pair them with a refreshing punch, iced tea, or even a celebratory glass of sparkling cider. They’re best enjoyed as a sweet finale to a celebratory meal or as a delightful snack throughout the day.
Storage & Reheating
Once the royal icing is completely dry and hardened (this can take several hours or overnight), store the decorated cookies in an airtight container at room temperature for up to 1 week. Layer them between sheets of parchment paper to prevent sticking and protect the delicate icing designs.
For longer storage, undecorated baked cookies can be frozen. Allow them to cool completely, then stack them with parchment paper in an airtight freezer-safe container or bag for up to 3 months. Thaw at room temperature before decorating. Decorated cookies can also be frozen carefully in an airtight container, but some delicate icing details might be more prone to damage. Thaw frozen decorated cookies slowly in the refrigerator, then at room temperature to minimize condensation.
Frequently Asked Questions
- Q: Can I make the cookie dough ahead of time?
- A: Absolutely! The cookie dough can be made up to 2 days in advance and stored tightly wrapped in the refrigerator. This makes party prep much easier. You can also freeze the dough for up to 3 months; thaw overnight in the fridge before rolling.
- Q: My royal icing is too runny/too thick. How do I fix it?
- A: If your icing is too runny, gradually add more sifted powdered sugar, a tablespoon at a time, until it reaches the desired consistency. If it’s too thick, add warm water, 1 teaspoon at a time, mixing well after each addition, until it’s perfect for piping or flooding.
- Q: How can I prevent my cookies from spreading in the oven?
- A: Ensure your butter is softened but not melted, chill your dough thoroughly (at least 30 minutes), and don’t overmix the dough. Also, make sure your oven temperature is accurate; an oven that’s too cool can cause spreading.
Final Thoughts
These Sheet Pan Graduation Sugar Cookies with Royal Icing are more than just a dessert; they’re a heartfelt way to honor the achievements of your graduate. With their tender texture, delightful flavor, and customizable decorations, they’re sure to bring smiles and sweet memories to your celebration. So gather your ingredients, unleash your creativity, and bake a batch of these festive treats. Your graduate (and all your guests!) will thank you for this delicious and memorable addition to their special day!